The idea for these homemade upcycled crayons came from a search I was doing for my newsletter. I was trying to find some fresh sources — blogs that I didn’t know about (which is hard to imagine since I’ve been blogging for 12 years and blogs are becoming a dying breed), but guess what? I found one that I didn’t know about! It’s called Paper & Stitch and they have so many cool DIY ideas. Their crayon gems caught my eye, they really know how to style and photograph their projects. But I wanted to make crayon sticks because I feel like the round ones are hard to use. Commence search for silicone molds!

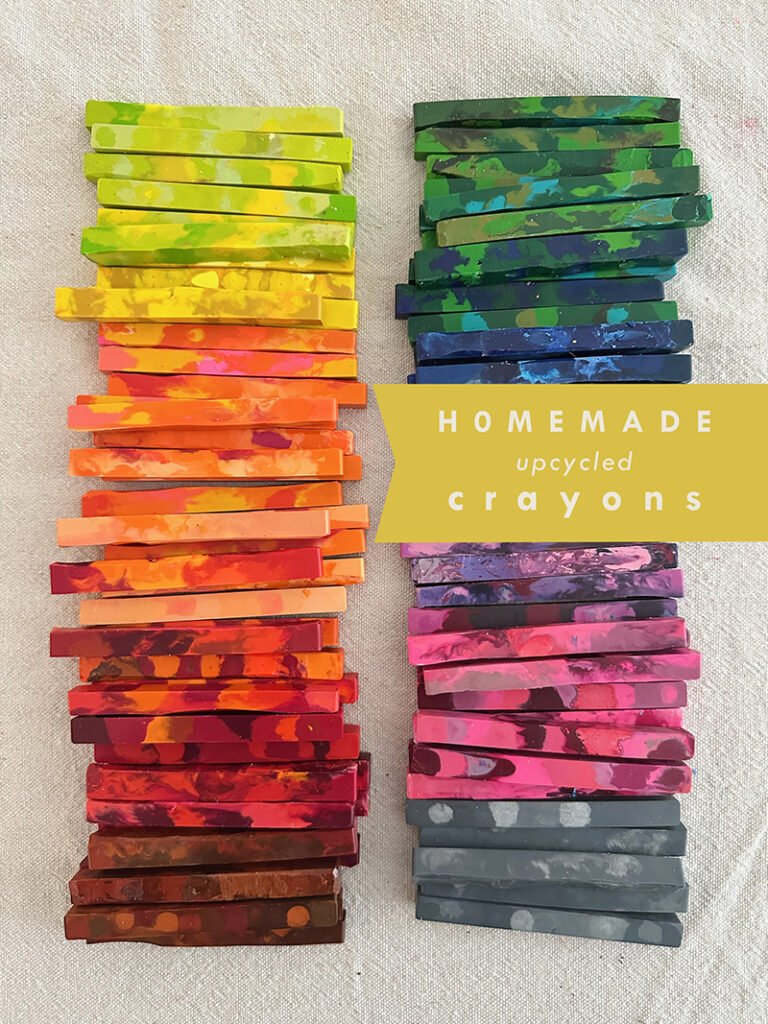
There was a lot to think about, like do I want a pointed tip? How long should they be? Will they break easily? Who will be using these, and how? I landed on these chocolate stick candy molds and they are good enough. I thought they might make crayons that were too thin, but they are chunky without being too block-y. Each crayon takes about 3 upcycled crayons so they are sturdier than the originals. Ideally, I would make something a bit rounder and easier to hold, but I think this is the best solution with what’s available.

[ I am a participant in affiliate programs designed to provide a means for bloggers to earn small fees at no cost to you by linking to Amazon.com and affiliated sites. ]
Supplies needed to make homemade crayons:
~ Crayons with papers peeled off (I like to soak overnight in water first. Some papers come off really easily, while others take some scraping. It helps to have an X-acto knife to cut down the paper wrapper for an easier to start peeling off the tricky ones.) I like using Crayola because some off-brand crayons don’t even melt, which you will see below.
~ Silicone mold (you can use anything, there are so many to choose from! I used this one)
~ Paring knife (optional, read to find out why I used one)

How to make homemade crayons:
1. After you have peeled all your crayons, sort them into color families. You can also use one color per crayon, but I wanted each crayon to have a variety of shades and hues in one family. Some crayons are so dark you can’t tell if they are black or navy or burgandy, so have scratch paper nearby. (FYI – I made solid black and solid white crayons.)
TIP: If you see some paper still on the crayons, you can just scratch it off with your nail.

2. Break the crayons up into small pieces (you can use scissors if you hand gets tired or if the pieces are too big). Above was my first try at filling the molds. It turned out not to be enough so I dropped some extra pieces in and returned it to the oven for a few more minutes. Below was my second set and it was a little bit too much. You will have to play around with the right balance, but I would say better too much than too little.
3. Put the mold on an old cookie tray and place it in the oven, heated to 300F for about 10-12 minutes or until everything has melted. You will smell the wax and it may even be a little smokey inside the oven. (Using the microwave did not work for me, but mine is old so you can try that method.)


You can see above how some of the crayons didn’t melt. I don’t know why, but I assume it’s some cheaper brands. It’s fine, I just trimmed them down with the knife.
TIP: When taking the melted wax tray out of the oven, make sure you have a surface nearby and ready to set down the tray. You will have to move very carefully and slowly so the wax doesn’t run off the sides too much. (Tips on how to clean the mold and tray below.)

4. Let the wax cool, I waited about an hour, and then pop the crayons out. If you underfill or fill the molds just right you won’t need to trim them. If you overfill then you can break off the extra on the sides but you might need to use the paring knife to clean them up. But there is another reason I used the paring knife.

When melting down the old crayons, the pigment can sink to the bottom a little and leave a thin layer of wax that is clear-ish. I used the paring knife to cut that part off because it would be frustrating for a child to use and not see any color on the paper. I’ve read that maybe heating at a lower heat can avoid this, so maybe try a 250F oven. I didn’t try this because I kind of liked the paring part, I’m weird that way.

You can see above some of the yellow crayon bits that didn’t melt. I kind of like the chunks.
TIP: Cover your table in paper so you can roll it up and throw it away. Doing this project on a dropcloth made cleanup harder because the wax clippings got stuck in the cloth.
5. Cleanup tips: I did not take photos of this part, but the silicone mold will be crusted with whatever color you melted after taking out the crayons. You will have to clean it well before setting in a new color. I cracked most of the remnants off by just folding the mold up and shaking it out. I also used my nail to scratch some bits off, and then washed it with soapy water. Make sure all the wax chunks go in the garbage, not the drain. Also, to clean the cookie sheet I poured some boiling water on it and then used paper towel to wipe it down. Again, all of it goes into the garbage, not the sink.


This DIY is quite time-consuming, so it’s not for everyone. If you want something a little easier I would try the small shape molds. But there was something so satisfying about this process for me, I just really loved it. I am thinking about how I can mass-produce these, so if anyone has any ideas I’m all ears!
Enjoy!
xx Bar
– – – – – – – – – – – – – – – – – – –
Did you like this post? Here are some more ways to make your own art materials:


Share this content: